Camera calibration
Calibrate the camera using a measured printed ChArUco target.
What you need
A connected, calibrated robot, a gripper camera, OpenCV and a flat printed board. Use Download A4 print here in the tool: the target is ChArUco 8×5 with nominal 35 mm squares. Measure the reference segment on the actual print because printer scaling may differ.
Setup and capture
- Open Camera calibration. Install OpenCV when prompted and wait for OpenCV ready.
- Select Start calibration, choose the camera and check its image.
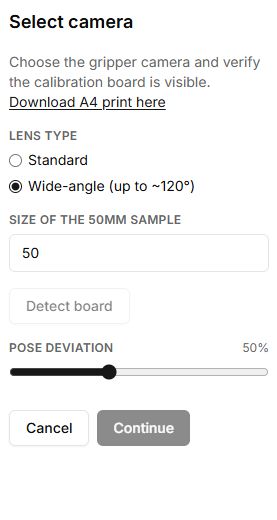
- Choose the appropriate Lens type. In Size of the 50mm sample, enter the measured printed reference length.
- Place the complete board in view and select Detect board. Proceed only once it is detected.
- Clear the movement area before Begin capture: the robot will change poses automatically. Keep the board stationary and visible.
- Wait for results, inspect successful-frame count and reprojection error, save the calibration and verify confirmation.
If calibration fails
Check lighting, focus, board flatness and print scale. At least 10 successful poses are required. ChArUco detection is not available refers to the loaded OpenCV build. A save error requires a separate profile and connection check; computed results are not necessarily saved results.
Buttons, fields and results
| Control | How to use it and what happens |
|---|---|
| Connect robot / Start calibration | Connect the robot. Start calibration becomes available after OpenCV and the robot configuration load; it opens camera setup rather than starting movement. |
| Camera | When several cameras are connected, select the capture camera. Check the live image, orientation and visibility of the entire board. |
| Download A4 print here | Opens the ChArUco board PDF for printing. Measure the reference segment on the actual printout. |
| Lens type: Standard / Wide-angle | Selects the lens distortion model. Use the option matching your camera; this choice affects the calculated coefficients. |
| Size of the 50mm sample | Enter the actual reference-segment length in millimetres, not the size of an individual square. With printing at original scale, it is 50 mm. |
| Detect board | Checks for the board in the current frame. Wait for Board detected and detected-corner markers. The button is unavailable without a camera or ready OpenCV. |
| Pose deviation | Changes the span of automatic poses from 20 to 100 percent of the defined range. Check that this span is safe for the camera, cables and workspace. |
| Continue | Opens the warning before capture. This button checks for a camera but does not require a successful Detect board result; verify detection yourself. |
| Begin capture | After safety confirmation, starts automatic movement through poses and image capture. The board must remain stationary and visible. |
| Pose: Pending / Moving / Captured / Missed | Indicates a waiting pose, movement, successful frame or missed frame. Calculation requires at least 10 successful frames; completed poses and successful frames are different counts. |
| Cancel | From setup, returns to the beginning; from confirmation, returns to setup. During capture, requests cancellation of the sequence; it is not an immediate emergency motor shutdown. |
| Reprojection error, fx, fy, cx, cy, Distortion | Calculation results: reprojection error is shown in pixels; the other values describe camera intrinsics. If the error is large, improve capture conditions and repeat the procedure. |
| Image size; Mirror H / Mirror V | The results show image resolution and the reflections used. These describe the completed capture; they are not toggles on the results screen. |
| Retake | Returns to the beginning for another capture. It does not save the current result in place of Save. |
| Save | Writes the calculated calibration to the selected saved robot profile. Wait for Calibration saved. Without a selected profile, do not assume saving succeeded; if Failed to save calibration appears, check sign-in and the profile. |
| Done | On the saved-result screen, returns to the tool’s initial state. |